Factory Method Pattern
객체 생성을 동적으로 해야해서 어떤 객체를 생성할지 알 수 없을 때, 객체 생성방법을 알고 있는 factory method를 따로 만들고 생성을 이 메소드에 위임해서 동적으로 생성해 사용하는 방법이다.
예를 들면, 여러 포맷을 지원하는 문서 편집기에서 새로운 문서를 생성할 때 문서 생성을 담당하는게 factory method가 된다. 그림판에서 삼각형, 사각형, 동그라미등의 도형을 생성하는 경우, 역시 객체 생성을 담당하는게 factory method이다. 좀 더 개인적으로 와닿는 예는 스타크래프트의 진짜 팩토리를 생각하면 된다. 팩토리는 탱크, 벌처, 골리앗등을 생산할 수 있고 플레이어가 유닛을 찍으면 해당 유닛이 나온다. 이 진짜 팩토리의 구현은 factory method를 들고 있는 Factory객체를 만들어서 가능하다.
기본 컨셉은 앞에서든 예들과 같은데, 실제 설계적 측면에서 변경사항이 발생할 때 유연하게 만들기 위해 상속과 인터페이스를 이용한다. 우선, Creator는 factory method를 구현하지 않고, 서브클래스가 실제 factory method를 구현하도록 위임한다. 변경사항이 발생할 경우, 변경지점을 분리해내는 작업이다. 변경사항의 예라고 한다면 생성할 product가 추가되거나(예 : 그림판에 별모양을 추가), factory method를 여러개(예: 스타에서 Barrack, Factory, Starport등 생성해야하는 유닛들이 다름) 만드는 경우등을 들 수 있다.
factory method에 의해 생성되는 객체들은 Product라는 동일 인터페이스를 갖도록 만든다. 도형의 예라면, 위치이동, 크기변경등 Shape로 이름지을 수 있는 추상클래스 또는 인터페이스가 존재하고, 스타크래프트 유닛이라면, move, stop, attack등 Unit으로 이름지을수 있는 추상클래스 또는 인터페이스가 가능하다.
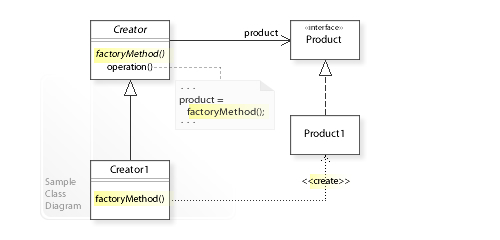
말로 설명했던 클래스들을 UML로 그려보면 다음과 같다. 직접 그리지 않고 Wikipedia 에서 가져왔는데, 의외로 샘플소스까지 설명이 잘 되어 있다.
실제로 구현해보자.
Kotlin
package factorymethod

data class Position(var x: Int = 0, var y: Int = 0, var z: Int = 0)
data class Size(var x: Int = 0, var y: Int = 0)
enum class FactoryUnit{VULTURE, TANK}
package factorymethod
abstract class StarUnit {
var pos: Position = Position()
abstract var speed: Int
abstract val health: Int
abstract fun move(newPos: Position)
abstract fun attack(attackPos: Position)
}
class Vurture: StarUnit() {
override var speed: Int = 3
override val health: Int = 10
override fun move(newPos: Position) {
println("Vurture move")
}
override fun attack(attackPos: Position) {
println("Vurture attack")
}
fun mineInstall(){
println("mine install at $pos")
}
}
class Tank: StarUnit() {
override var speed: Int = 1
override val health: Int = 30
private var siegeMode: Boolean = false
override fun move(newPos: Position) {
if(siegeMode){
println("Siegemode. Can't move")
}else{
println("Tank move")
}
}
override fun attack(attackPos: Position) {
if(siegeMode){
println("Siegemode. Artillery fire.")
}else{
println("Tank nomal fire.")
}
}
fun modeChange(){
siegeMode = !siegeMode
}
}Product에 해당하는 StarUnit을 만들고 concrete class로 Vurture, Tank를 만들었다.
package factorymethod

abstract  class Building{
    abstract fun factoryMethod(type: FactoryUnit): StarUnit
}

class Factory: Building() {
    override fun factoryMethod(type: FactoryUnit): StarUnit {
        when(type){
            FactoryUnit.TANK    ->  return Tank()
            FactoryUnit.VULTURE ->  return Vurture()
            else -> throw Exception("Can't produce $type unit.")
        }
    }
}factory method를 서브클래스에서 구현했다. 찾아보니, 이 부분을 companion object로 구현하기도 하는거 같다.
package factorymethod

fun main(args: Array<String>){
    val factory:Building = Factory()

    val unit1: StarUnit = factory.factoryMethod(FactoryUnit.VULTURE)
    val unit2: StarUnit =  factory.factoryMethod(FactoryUnit.VULTURE)
    val unit3: StarUnit = factory.factoryMethod(FactoryUnit.TANK)

    unit1.move(Position(10, 5, 15))
    unit2.attack(Position(3, 20, 4))
    unit3.move(Position(7, 7, 4))
    unit3.attack(Position(10, 20, 30))
}Vurture move
Vurture attack
Tank move
Tank nomal fire.클라이언트 코드에서 필요할 때마다 동적으로 유닛을 생산하고 조작할 수 있다. 한가지 의문점은 각 유닛마다 특화된 커맨드는 어떻게 처리해야 하는가인데, 다른 디자인패턴을 이용하거나 구조가 복잡해질거 같아 여기서는 구현하지 않았다. 디자인 패턴을 살펴보다가 다시 나올 수도.
C#
C#이긴한데, Unity에서 구현했다. 특별한 의존성은 Vector3와 main함수 대신 client 의 start()를 사용한 것외에 없다.
using UnityEngine;

namespace FactoryMethod
{
    public abstract class StarUnit
    {
        protected Vector3 pos = new Vector3();
        public abstract int Speed { get; }
        public abstract int Health { get; set; }

        public abstract void Move(Vector3 newPos);
        public abstract void Attack(Vector3 attackPos);
    }

    public class Vurture : StarUnit
    {
        private int _health = 10;
        private int _speed = 3;
        public override int Speed { get{ return _speed; } }
        public override int Health { get { return _health; } set { _health = value; } }

        public override void Attack(Vector3 attackPos)
        {
            Debug.Log("Vurture attack");
        }

        public override void Move(Vector3 newPos)
        {
            Debug.Log("Vurture move");
        }

        public void mineInstall()
        {
            Debug.Log("mine install at " + pos);
        }
    }

    public class Tank : StarUnit
    {
        private int _health = 30;
        private int _speed = 1;
        private bool _siege = false;

        public override int Speed { get { return _speed; } }
        public override int Health { get { return _health; } set { _speed = value; } }

        public override void Attack(Vector3 attackPos)
        {
            if (_siege)
            {
                Debug.Log("Siegemode. Artillery fire.");
            }
            else
            {
                Debug.Log("Tank normal fire.");
            }
        }

        public override void Move(Vector3 newPos)
        {
            if (_siege)
            {
                Debug.Log("Siegemode. Can't move.");
            }
            else
            {
                Debug.Log("Tank move.");
            }
        }

        public void modeChange()
        {
            _siege = !_siege;
        }
    }
}
C# 구현에서 눈여겨 볼 부분은 variable을 다루는 부분이다. 직접적으로 abstract로 설정이 안되므로 property의 get()/set()을 abstract method로 다루고 있다.
namespace FactoryMethod
{
    public enum FactoryUnit { VURTURE, TANK }

    public abstract class Building
    {
        public abstract StarUnit FactoryMethod(FactoryUnit type);
    }

    public class Factory : Building
    {
        public override StarUnit FactoryMethod(FactoryUnit type)
        {
            switch (type)
            {
                case FactoryUnit.TANK:
                    return new Tank();
                case FactoryUnit.VURTURE:
                    return new Vurture();
                default:
                    throw new System.Exception();
            }
        }
    }
}enum에도 public을 붙여줘야 다른 곳에서 사용가능하다.
using UnityEngine;
using FactoryMethod;

public class Client : MonoBehaviour
{
    // Start is called before the first frame update
    void Start()
    {
        Building factory = new Factory();

        StarUnit unit1 = factory.FactoryMethod(FactoryUnit.VURTURE);
        StarUnit unit2 = factory.FactoryMethod(FactoryUnit.VURTURE);
        StarUnit unit3 = factory.FactoryMethod(FactoryUnit.TANK);

        unit1.Move(new Vector3(10, 5, 15));
        unit2.Attack(new Vector3(3, 20, 4));
        unit3.Move(new Vector3(7, 7, 4));
        unit3.Attack(new Vector3(10, 20, 30));
    }

}
main함수대신 empty game object를 하나 생성하고 Client.cs 스크립트를 붙여줘서 테스트 했다.

Python
from dataclasses import dataclass
from enum import Enum


@dataclass
class Position:
    x: int = 0
    y: int = 0
    z: int = 0


class FactoryUnit(Enum):
    VURTURE = 1
    TANK = 2
Kotlin에서와 동일하게 data class와 enum class를 python 문법으로 정의했다.
from factory_method.data import *

class StarUnit:
    def __init__(self):
        self.pos: Position = Position()

    @property
    def health(self):
        raise NotImplementedError

    @health.setter
    def health(self, value):
        raise NotImplementedError

    @property
    def speed(self):
        raise NotImplementedError

    def move(self, new_pos: Position):
        raise NotImplementedError

    def attack(self, attack_pos: Position):
        raise NotImplementedError

class Vulture(StarUnit):
    def __init__(self):
        super().__init__()
        self._speed = 3
        self._health = 10

    @property
    def health(self):
        return self._health

    @health.setter
    def health(self, value):
        self._health = value

    @property
    def speed(self):
        return self._speed

    def move(self, new_pos: Position):
        print(f"Vurture move to {new_pos}")

    def attack(self, attack_pos: Position):
        print(f"Vurture attack to {attack_pos}")

    def mine_install(self):
        print(f"mine install at {self.pos}")

class Tank(StarUnit):
    def __init__(self):
        super().__init__()
        self._speed = 1
        self._health = 30
        self._siege_mode = False

    @property
    def health(self):
        return self._health

    @health.setter
    def health(self, value):
        self._health = value

    @property
    def speed(self):
        return self._speed

    def move(self, new_pos: Position):
        if self._siege_mode:
            print("Siegemode. Can't move.")
        else:
            print(f"Tank move to {new_pos}")

    def attack(self, attack_pos: Position):
        if self._siege_mode:
            print(f"Siegemede. artillery fire! To {attack_pos}")
        else:
            print(f"Tank nomal attack to {attack_pos}")
Python에서 abstract class를 만드는 방법은 abs 모듈을 임포트해서 ABC를 상속받아 쓰는 방법이 있다. 여기서는 단순하게, raise exception을 이용해 구현했다. C#에서와 마찬가지로 member variable을 abstract로 만드는 방법이 없으므로, property를 이용해 getter/setter를 상속받도록 만들었다.
from factory_method.StarUnit import *

class Building:

    def factory_method(self, unit_type: FactoryUnit) -> StarUnit:
        raise NotImplementedError

class Factory(Building):
    def factory_method(self, unit_type: FactoryUnit) -> StarUnit:
        if unit_type == FactoryUnit.VURTURE:
            return Vulture()
        elif unit_type == FactoryUnit.TANK:
            return Tank()
        else:
raise ValueErrorfactory_method만 서브클래스에서 구현하도록 만들었다.
from factory_method.Building import *
from factory_method.StarUnit import *

def main():
    myFactory: Building = Factory()
    unit1: StarUnit = myFactory.factory_method(FactoryUnit.VURTURE)
    unit2: StarUnit = myFactory.factory_method(FactoryUnit.VURTURE)
    unit3: StarUnit = myFactory.factory_method(FactoryUnit.TANK)

    unit1.move(Position(10, 5, 15))
    unit2.attack(Position(3, 20, 4))
    unit3.move(Position(7, 7, 4))
    unit3.attack(Position(10, 20, 30))


if __name__ == "__main__":
    main()
Client에서 사용은 다른언어와 동일하다. 동적으로 생성하고 사용할 수 있다.
Vurture move to Position(x=10, y=5, z=15)
Vurture attack to Position(x=3, y=20, z=4)
Tank move to Position(x=7, y=7, z=4)
Tank nomal attack to Position(x=10, y=20, z=30)
이걸 보면서 느낀점은 디자인 패턴을 이해하기 위해 두가지를 이해해야 한다는 사실이다.
- 해결하려는 문제가 무엇인가?
- 수정이나 변경에 대해 어떻게 유연하게 만들것인가?
Factory method에서 1번 문제는 객체들을 동적으로 생성하는데 어떤 객체를 생성할지 알 수 없다는 점이다. 이를 위해 객체 생성방법을 알고 있는 factory method를 도입했다.
2번문제의 답은 대부분 유사한데, interface, virtual class를 이용해 관계를 맺도록 하는 것이다. 여기에선 Factory method를 서브클래스에 구현을 하도록 위임해서 factory method의 변경이 간편하도록 했고, Product들은 인터페이스를 통일 시켜 Creator와의 커플링을 느슨하게 만들었다.
앞으로 올릴 Design Pattern들도 여기에 포커싱을 해서 정리해보도록 노력하겠다.