간단히 알람앱을 하나 만들다가 간단히 안되서 좀 많이 빡치고 오래걸렸다. 그 경험을 기록하려 한다. 마구잡이로 하다가 성공하고나서 뭐가 어떻게 동작하는지 하루종일 버전별로 이것 저것 테스트 해봤는데, 여전히 혼란스럽기 때문에 적당히 정리가 필요하다. 시작하기전에 꼭 알아야 하는점은, Alarm 앱을 만드는데에 AlarmManager로 해결되지 않는다는 사실이다. AlarmManager를 사용은 하겠지만, 실제 표시하는 부분은 Notification을 이용한다. 이름때문에 함정에 빠지지말자.
일단, 기본 notification 동작에 대해 알아보자. 공식 문서의 내용과 이미지들을 가져왔다. 공식 사이트의 notification 항목을 참조.
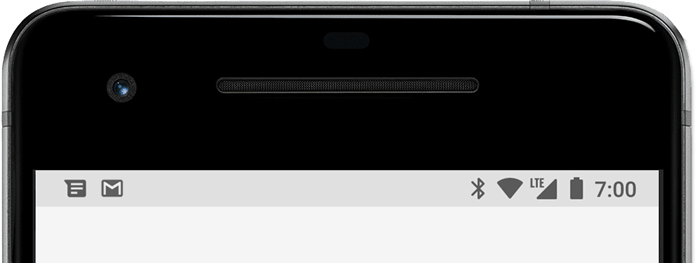
익히 알겠지만, notification은 상단 상태바에 아이콘으로 표시된다.
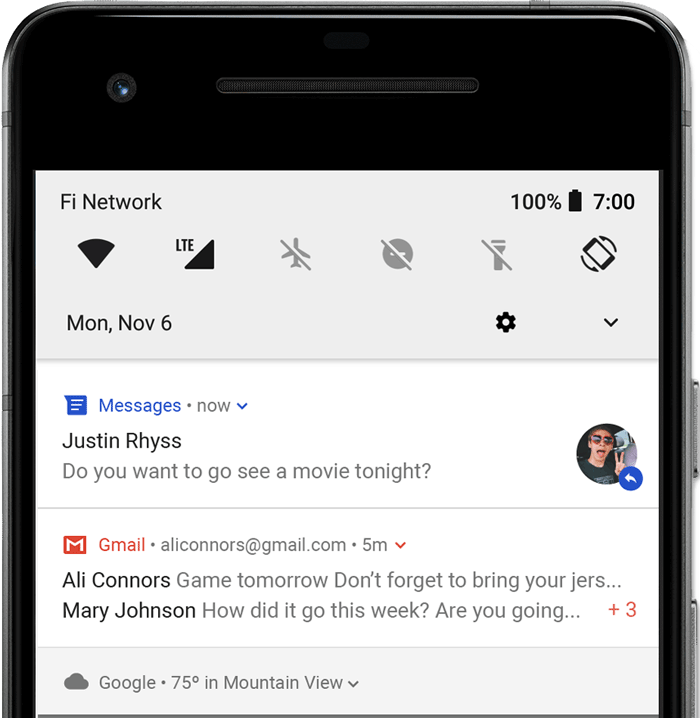
폰의 상단을 드래그해서 아래로 내리면, notification의 내용을 볼 수 있다.
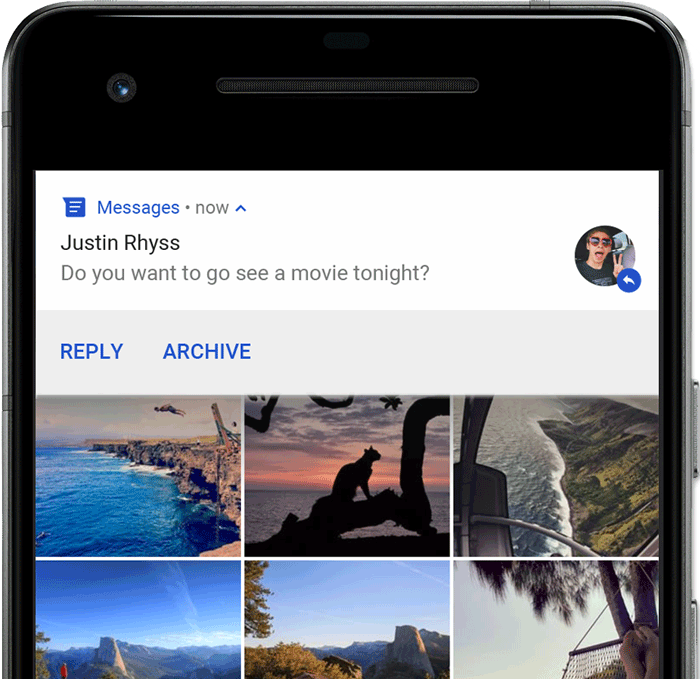
Head up Notification의 경우, 위와같이 Notification의 내용이 화면 상단에 표시가 된다. 위 이미지의 REPLY, ARCHIVE는 버튼처럼 동작하는데, Notification에 Action을 추가해주면 사용할 수 있다. 클릭시, 지정한 인텐트를 날리게 된다. Head up notification이 보여지는 조건은 다음과 같다.
- fullscreen mode를 사용(Notification 만들 때, fullScreenIntent를 지정한다.)
- Notification이 high priority를 갖고, Ringtone sound와 vibration을 사용시(Android 7.1, API level 25 이하)
- Notification channel이 high importance를 갖을 때. (Android 8.0, API level 26 이상)
Notification의 기본적인 표시구조는 다음과 같다.

- small Icon : setSmallIcon()
- App name : provided by the system
- Time stamp : setWhen(), setShowWhen(false)
- Large Icon : setLargeIcon()
- Title : setContentTitle()
- Text : setContentText()
위에서 본 일반적인 notification은 별 문제없이 작동한다. 단, Android 7.1 에서 8.0(Oreo)으로 넘어가면서 Notification channel이 추가됐으며, 각 notification에 설정하던 priority가 channel 별 importance로 변경되었으니 이를 처리해주면 된다.
채널 생성은 Android 8.0 이상인지 체크해서 다음과 같이 생성한다.
if (Build.VERSION.SDK_INT >= Build.VERSION_CODES.O) {
     val name = context.getString(R.string.basic_channel_name)
     val descriptionText = context.getString(R.string.basic_channel_desc)
     val importance = NotificationManager.IMPORTANCE_DEFAULT
     val channel = NotificationChannel(
         context.getString(R.string.basic_noti_channel_id),
         name,
         importance
     ).apply {
         description = descriptionText
     }
     val notificationManager =
         context.getSystemService(Context.NOTIFICATION_SERVICE) as NotificationManager
     notificationManager.createNotificationChannel(channel)
}간단한 notification은 다음과 같이 생성한다. 호환성을 위해 NotificationCompat을 사용하는걸 볼 수 있다.
val intent = Intent(context, NotiSampleActivity::class.java).apply {
     flags = Intent.FLAG_ACTIVITY_NEW_TASK or Intent.FLAG_ACTIVITY_CLEAR_TASK
 }
 val pendingIntent = PendingIntent.getActivity(context, 0,intent, 0)
 val builder = NotificationCompat.Builder(context, context.getString(R.string.basic_noti_channel_id)).apply {
     setSmallIcon(R.drawable.ic_launcher_foreground)
     setContentTitle("basic notification")
     setContentText("It's basic notification!")
     priority = NotificationCompat.PRIORITY_DEFAULT
     setContentIntent(pendingIntent)
     setAutoCancel(true)  // 터치시 인텐트를 보내고 자동으로 notification 제거
 }
 val notificationId = 1
 with(NotificationManagerCompat.from(context)){
     notify(notificationId, builder.build())
}Notification을 update 하는 경우에는 변경된 Notification을 생성하고 같은 notification id를 이용해서 notify하면 된다. 제거는 NotificationManager.cancel(notification id)를 이용한다.
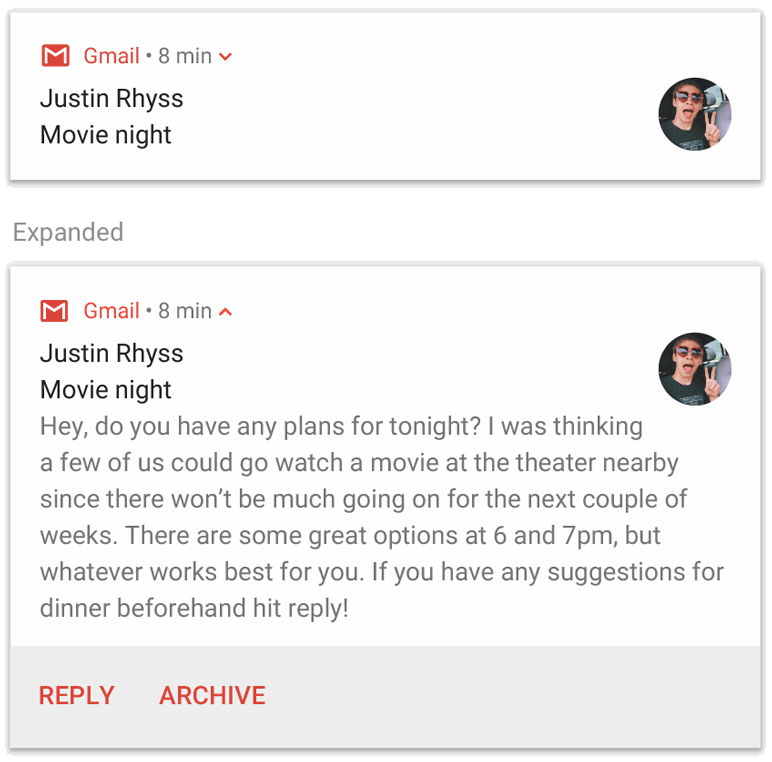
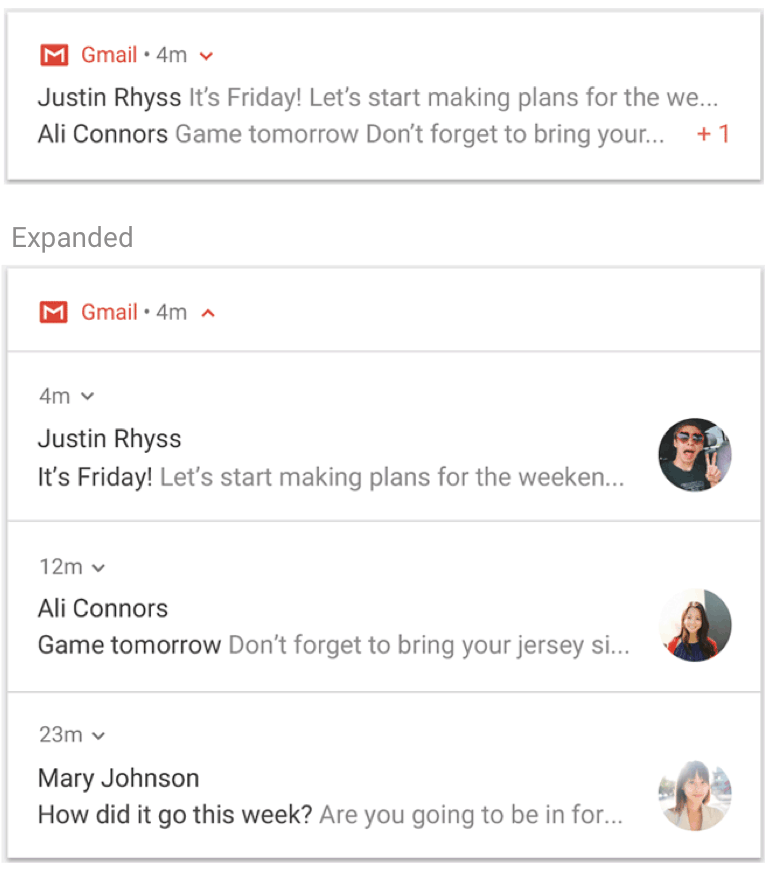
기본형태 이외에도 텍스트가 많은경우 expandable notification을 사용할 수 있다.
Android 7.0부터는 동일 앱의 여러 notification을 group으로 묶어 다음과 같이 사용도 가능하다.
이 외에도 media player타입등 미리 정의된 다른 형태들도 사용가능하고, 사용자 커스터마이즈도 가능하다. 여기서 다루는 핵심 주제는 아니므로 필요하다면, 처음에 언급했던 공식 문서를 참고하자.
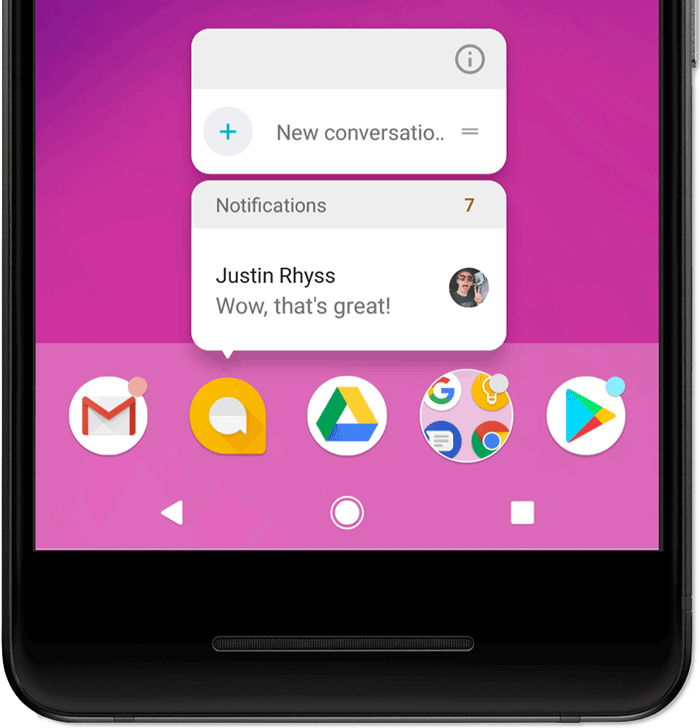
Android 8.0 부터 앱 아이콘에도 Notification이 표시된다. 이를 App icon badge라고 부른다. Notification이 있는 경우, 색이 있는 “badge”( notification dot)이라고도 부른다.)가 표시된다. 아이콘을 long press해서 notification을 보거나 해제시킬 수 있다.

알람을 위한 Fullscreen Intent
이제부터가 본론이다. 전화가 오거나 알람을 울리는 경우처럼 time-sensitive하게 중요한 notification은 fullscreen Intent를 사용한다. 이렇게 하면, background상태에서도 Activity를 띄울 수 있다. 만약, 사용자가 디바이스를 사용중이라면 head-up notification을 사용해서 보여줄 것이다.
fullscreen intent를 사용하려면, Android 10( API level 29)부터는 USE_FULL_SCREEN_INTENT permission이 필요하다.
<uses-permission android:name="android.permission.USE_FULL_SCREEN_INTENT" />fullscreen intent가 제대로 동작하기 위해서 notification channel을 사용하는 Android 8.0부터는 채널의 importance를 high로 설정해야한다. 하나의 앱에서 채널은 여러개 사용이 가능하니, 다른 notification도 사용하는 경우, fullscreen intent용 채널을 분리해서 사용하면 된다.
fun createNotiChannelHigh(context: Context) {
     // basic notification channel
     if (Build.VERSION.SDK_INT >= Build.VERSION_CODES.O) {
         val name = context.getString(R.string.high_importance_channel_name)
         val descriptionText = context.getString(R.string.high_importance_channel_desc)
         // 중요 부분. importance high로 설정해야 한다!
         val importance = NotificationManager.IMPORTANCE_HIGH
         val channel = NotificationChannel(
             context.getString(R.string.high_noti_channel_id),
             name,
             importance
         ).apply {
             description = descriptionText
         }
         val notificationManager =
             context.getSystemService(Context.NOTIFICATION_SERVICE) as NotificationManager
         notificationManager.createNotificationChannel(channel)
     }
}notification을 생성하는 부분은 다음과 같다. setFullscreenIntent()를 이용해, fullscreen으로 보여줄 Activity의 PendingIntent를 추가해준다. 이는 Content Intent와 별개로 동작하므로, 같아도 되고 달라도 된다.
val intent = Intent(context, NotiSampleActivity::class.java).apply {
     flags = Intent.FLAG_ACTIVITY_NEW_TASK or Intent.FLAG_ACTIVITY_CLEAR_TASK
 }
 val pendingIntent = PendingIntent.getActivity(context, 0,intent, 0)
// fullscreen 용 Activity Intent 생성
 val fullscreenIntent = Intent(context, FullscreenIntentActivity::class.java).apply {
     action = "fullscreen_activity"
     flags = Intent.FLAG_ACTIVITY_NEW_TASK or Intent.FLAG_ACTIVITY_CLEAR_TASK
 }
 val fullscreenPendingIntent = PendingIntent.getActivity(context, 0, fullscreenIntent, PendingIntent.FLAG_UPDATE_CURRENT)

 val builder = NotificationCompat.Builder(context, context.getString(R.string.high_noti_channel_id)).apply {
     setSmallIcon(R.drawable.ic_launcher_foreground)
     setContentTitle("fullscreen intent notification")
     setContentText("fullscreen intent notification!")
     setAutoCancel(true)
     setDefaults(Notification.DEFAULT_LIGHTS or Notification.DEFAULT_VIBRATE)
     setCategory(NotificationCompat.CATEGORY_ALARM)
     setVisibility(NotificationCompat.VISIBILITY_PUBLIC)
     setLocalOnly(true)
     priority = NotificationCompat.PRIORITY_MAX
     setContentIntent(fullscreenPendingIntent)
     // <-- set full screen intent
     setFullScreenIntent(fullscreenPendingIntent, true)
}앞서 얘기했듯, full screen intent지만 디바이스 사용중에는 headup notification으로 표시된다. full screen으로 Activity가 뜨는 경우는 화면이 꺼져 디바이스가 슬립상태에 있을 때이다. 하지만, 이 경우에도 화면이 자동으로 켜지진 않는다. 슬립상태에서 자동으로 화면이 켜지고 알람이 보이려면 처리해야할 부분들이 남았다.
이제 문제가 되는 부분이 lock screen이 걸린 상황과 화면이 꺼져있을 때 화면을 켜야하는 경우이다. 일반적으로 lock screen이 걸려있을 때, notification은 이미지와 같이 표시된다.
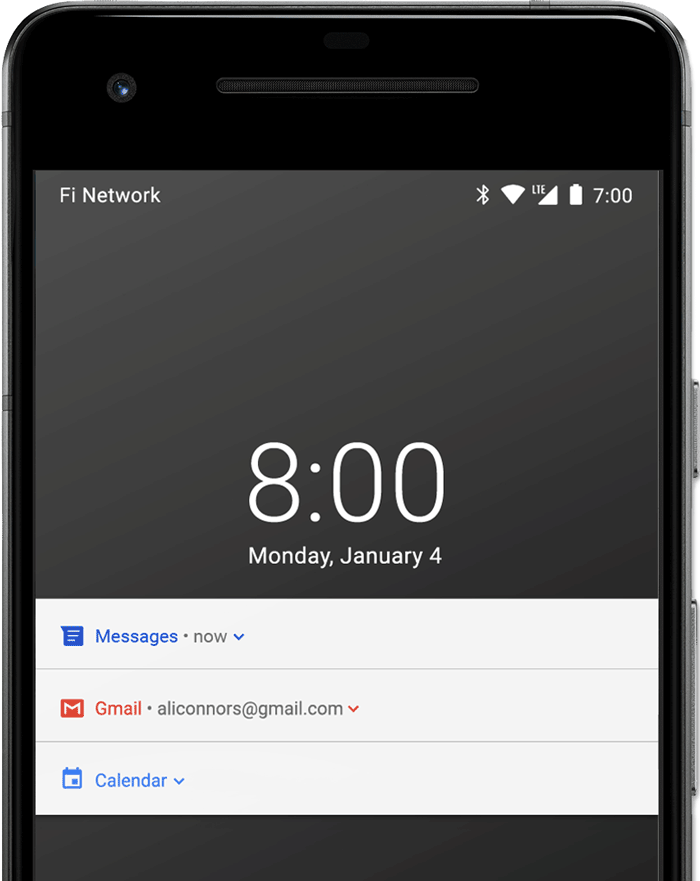
lock이 걸린 상태에서 notification을 보여줄지(VISIBILITY_SECRET, VISIBILITY_PRIVATE), 내용까지 전부 보여줄지(VISIBILITY_PUBLIC) 여부는 lock screen visibility를 설정해서 변경 가능하다. 이는 유저가 설정에서 바꿀 수도 있다.
스크린을 키고 lock 위로 Activity를 띄우는 부분은 Android 7, 8, 8.1을 거치며 많은 변화가 있었다. 호환성을 위해 버전을 체크하며 코드를 작성하면 다음과 같이 된다.
private fun turnScreenOnAndKeyguardOff(){
     if (Build.VERSION.SDK_INT >= Build.VERSION_CODES.O_MR1) {
         setShowWhenLocked(true)
         setTurnScreenOn(true)
         window.addFlags(WindowManager.LayoutParams.FLAG_KEEP_SCREEN_ON
                 or WindowManager.LayoutParams.FLAG_ALLOW_LOCK_WHILE_SCREEN_ON)
     } else {
         window.addFlags(WindowManager.LayoutParams.FLAG_SHOW_WHEN_LOCKED    // deprecated api 27
                 or WindowManager.LayoutParams.FLAG_DISMISS_KEYGUARD     // deprecated api 26
                 or WindowManager.LayoutParams.FLAG_KEEP_SCREEN_ON
                 or WindowManager.LayoutParams.FLAG_TURN_SCREEN_ON   // deprecated api 27
                 or WindowManager.LayoutParams.FLAG_ALLOW_LOCK_WHILE_SCREEN_ON)
     }
     val keyguardMgr = getSystemService(Context.KEYGUARD_SERVICE) as KeyguardManager
     if (Build.VERSION.SDK_INT >= Build.VERSION_CODES.O) {
         keyguardMgr.requestDismissKeyguard(this, null)
     }
}먼저, Android 8.1 여부를 체크하는데, WindowManager로 세팅하는 플래그중 FLAG_SHOW_WHEN_LOCKED와 FLAG_TURN_SCREEN_ON이 Activity의 setShowWhenLocked(), setTurnScreenOn()메소드를 호출하는 것으로 변경되었다. 정확한건 모르겠지만, 의도하지 않은 두번의 라이프 사이클 이벤트를 방지하기 위한 거라고 한다.
공통으로 적용하는 부분으로는 FLAG_KEEP_SCREEN_ON, FLAG_ALLOW_LOCK_WHILE_SCREEN_ON이 있다.
마지막으로 Android 8.0을 체크하는 부분이 있는데, 바로 keyguard 부분이다. 이전에는 역시 FLAG를 사용하여 FLAG_DISMISS_KEYGUARD를 설정했으나, keyguard service로 requestDismissKeyguard()를 호출하도록 변경되었다. 변경 이유는 해당 플래그를 가진 Activity가 포커스 되었을 때, Keyguard가 해제되므로 의도하지 않은 터치를 막지 못해서라고 한다.
사실, 이부분 때문에 삽질을 엄청했는데, dismiss keyguard부분이 있어야 notification이 왔을 때 setScreenTurnOn()이 정상작동하여 자동으로 화면이 켜진다. 예전이라면, FLAG_TURN_SCREEN_ON 과 FLAG_DISMISS_KEYGUARD가 반드시 같이 사용되어야 한다는 말이다.
지금까지 notification으로 화면에 표시하는 부분을 해결했다면, Alarm을 만들기위해 정확한 시점에 notification을 생성해야 한다. 이는 AlarmManager의 setExactAndAllowWhileIdle()을 사용하면 가능하다. fun fullscreenNotiWithAlarm(context: Context){
val alarmManager = context.getSystemService(Context.ALARM_SERVICE) as AlarmManager
val intent = Intent(context, NotiBroadcastReceiver::class.java).apply {
action = DONIT_TIMER_ALARM
}
val alarmIntent = PendingIntent.getBroadcast(context, 0, intent, PendingIntent.FLAG_UPDATE_CURRENT)
alarmManager.setExactAndAllowWhileIdle(
AlarmManager.ELAPSED_REALTIME_WAKEUP,
SystemClock.elapsedRealtime() + DONIT_ALARM_LENGTH,
alarmIntent)
}PendingIntent의 getActivity()로 직접 Activity를 띄울 수도 있겠지만, 테스트시 문제가 좀 있었다. 그래서 getBroadcast()를 이용하고, BroadcastReceiver에서 Fullscreen Intent를 생성했다. 단, 이부분은 매우 혼란스러운 상황에서 확인된거라 확실한 검증이 필요할 거 같다. 혹시 제대로 동작하지 않는다면 참고하길. 여기서 사용한 BroadcastReceiver는 다음과 같다.
class NotiBroadcastReceiver: BroadcastReceiver() {
     override fun onReceive(context: Context?, intent: Intent?) {
         if (intent != null) {
             Log.d("NotiBroadcastReceiver", "action : ${intent.action}, extra : ${intent.getIntExtra(EXTRA_NOTIFICATION_ID, 0)}")
             when(intent.action){
                 DONIT_TIMER_ALARM -> {
                     if (context != null) {
                         fullscreenNotification(context)
                     }
                 }
             }
         }
     }
}별다른 작업없이 Intent를 확인 후, fullscreen notification을 생성해주고 있다.
마지막으로, WAKE_LOCK을 생각해 볼 수 있다. 이 부분도 확실한 검증을 거치지 못했는데, sleep에서 깨어나 보통은 바로 sleep으로 들어가므로 필요할수도 있다. 두가지를 생각해 볼 수 있는데, BroadcastReceiver가 동작하는동안 WAKE LOCK을 거는 것과, fullscreen Activity에 WAKE LOCK을 거는 것을 생각해 볼 수 있다.
마지막의 마지막으로 사족을 하나만 더 달자면, fullscreen intent로 띄우는 Activity는 notification의 dismiss에 대한 책임을 갖는다. 별다른 처리를 안하면, 화면을 닫아도 status bar에 notification이 남아서 동작할 것이다. dismiss 버튼을 달든, Activity의 pause()나 stop()에서든 notification id를 이용해 해당 notification을 cancel해줘야 할 것이다.
이정도면 대충 더럽게 알아낸 안드로이드에서 알람 만들기 정리는 끝. 바이~
설명이 너무 친절해서 이해가 쏙쏙 됩니다
감사해요!
개인 정리 목적이 강해서 두서없는 내용들이 많은데, 도움이 되셨다니 저도 기분이 좋네요 🙂
Flutter로 알람앱 만드는데 거의 네이티브로 하고있네요 ㅋㅋ 많은 도움이 되었습니다. 감사해요
오… 알람부분은 아무래도 네이티브로 구현되야 하나보군요. 어쨌든, 개인적인 정리가 다른 누군가에게도 도움이 된다는건 기분좋은 일인거 같네요 ㅋㅋ
구글 알람 앱 주소 남기고 갑니다. 좋은 참고서가 될 것 같아요.
https://android.googlesource.com/platform/packages/apps/DeskClock/+/refs/heads/master/src/com/android/deskclock/alarms/AlarmActivity.kt
정보 감사합니다 😀
저도 안드로이드 문서에 있는대로 만들었다가 제시간에 알람이 안와가지고 완전 고생했는데, 이 글 보고 해결했습니다. 감사합니다… 압도적 감사…
오… 문서에 정보가 부족하다고 느끼긴했는데 의외로 여러분들에게 도움이 되고 있네요 ㅋㅋ
고생하다 해결하셨다니, 괜히 제가 한시름 놓이네요. 어떤기분일지 알거 같아요 ㅎㅎ
리액트 네이티브로 알람 기능 구현중에 안드로이드 네이티브로 구현이 필요했는데 어찌 구현하나 감이 잘안왔는데 이 글보고 큰도움 얻어갑니다. 좋은글 감사합니다. 많은 도움이 되었습니다!!
도움이 되셨다니 보람이 있네요 ㅋㅋ
알람&알림 관련해서 여러 문서 찾아보고 있었는데, 드디어 해결했습니다. 너무 감사드려요.^^
관련 내용이 새버전에 따라 계속 조금씩 바뀌는거 같긴한데, 어쨌든 해결하셨다니 다행이네요. 알람에 대한 기본 힌트는 드린거 같군요 ㅋㅋ